Building your own drone is more than a hobby - it’s a complete engineering project that combines electronics, mechanics, and coding. Unlike buying a ready-to-fly quadcopter, creating a DIY drone gives you the freedom to choose every part, design your own printed circuit board (PCB), and even modify flight behavior through open-source firmware.
In this guide, you’ll learn where to get the right drone components, how to design or source the PCB, what open-source projects can accelerate your build, and the full step-by-step workflow for turning parts into a flying machine.
1. Planning Your DIY Drone Project
Before buying parts, decide the type of drone you want to build:
- Racing Drone: Lightweight, high-thrust setup with fast response ESCs and small LiPo packs.
- Cinematic Drone: Stable flight, GPS module, and gimbal support for aerial video.
- AI Drone / Autonomous Drone: Equipped with onboard microcontrollers or AI modules for obstacle avoidance and self-navigation.
Then, define your goals - flight time, range, payload, and budget. This will help determine frame size, motor type, battery rating, and PCB complexity.
2. Where to Source Components
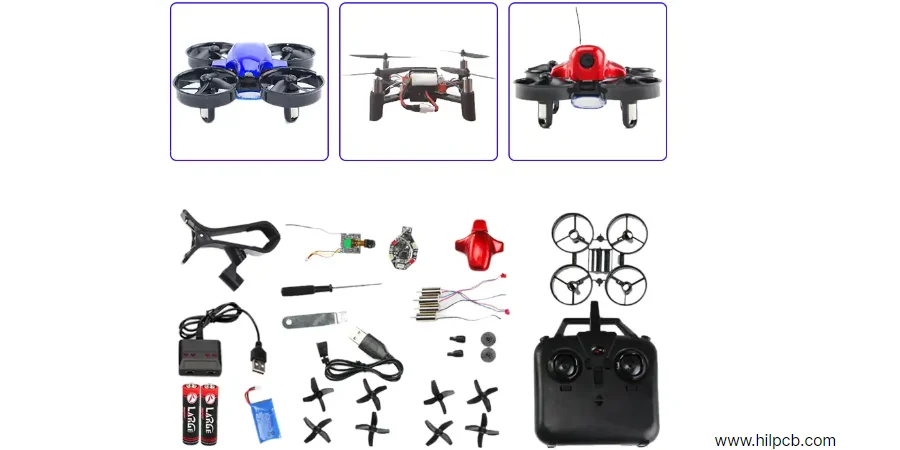
Option 1: Buy a Complete DIY Drone Kit
If you’re a beginner, start with a ready-to-assemble kit from marketplaces like:
- Amazon, Banggood, or AliExpress (for general-purpose kits)
- FPV stores such as GetFPV or DroneMesh (for racing drones)
- Educational kits from Makerfire or Elecrow (for STEM learning)
These kits typically include the frame, motors, ESCs, flight controller, and propellers - everything but the transmitter and battery.
Option 2: Mix and Match Components
Intermediate and advanced builders often source individual parts:
- Motors & ESCs: From brands like T-Motor, iFlight, or EMAX.
- Flight Controllers: F4, F7, or H7 boards supporting Betaflight, Ardupilot, or iNav firmware.
- FPV System: Analog or digital video transmitters (VTX), such as DJI O3 or Walksnail.
- GPS, barometer, and range sensors for autonomous flight.
Option 3: Custom PCB and Open-Source Builds
For full control and learning, many makers design their own PCB - either for the flight controller or for a power distribution board (PDB). You can manufacture custom boards through services like HILPCB, using your own schematic or adapting open-source drone PCBs from GitHub.
3. Using Open-Source Drone Platforms
One of the most powerful aspects of DIY drones is open-source software. You don’t have to write firmware from scratch - instead, build on existing ecosystems:
- Betaflight: Ideal for FPV and freestyle drones, with excellent tuning options.
- ArduPilot: Feature-rich, supports autonomous flight paths, GPS hold, and return-to-home.
- PX4: Professional-grade, widely used in research and commercial drones.
- iNav: Focused on navigation and GPS stability for fixed-wing or multirotor setups.
All these systems have active communities, free schematics, and 3D-printable drone parts available on GitHub and Thingiverse.
4. Designing or Selecting the Drone PCB
The PCB is the foundation of your drone’s reliability. You can either:
- Use an existing open-source PCB design (e.g., PX4 flight controller layout), or
- Design your own using KiCad or Altium.
Key design principles include:
- Separate high-current motor paths from sensitive sensor circuits.
- Add decoupling capacitors near the MCU and ESCs.
- Use thick copper layers (2-4 oz) for the power section.
- Apply thermal vias for MOSFET cooling in the ESC area.
- Include EMI shielding for 2.4 GHz RF sections to reduce interference.
Once the PCB layout is ready, export Gerber files and send them for manufacturing.
If you prefer a professional finish, services like HILPCB can also assemble the components (SMT + DIP).
5. Step-by-Step Drone Assembly Workflow
Follow this structured process to assemble your drone efficiently:
- Frame Assembly: Mount arms, plates, and dampers using carbon fiber or aluminum components.
- Motor Installation: Secure brushless motors and solder ESC wires to the PCB or PDB.
- Power Setup: Connect the LiPo battery to the main power input (via XT60 connector).
- Flight Controller Wiring: Link the FC with ESC signal lines, GPS, receiver, and sensors.
- Firmware Flashing: Install Betaflight or Ardupilot firmware using a USB programmer.
- Radio Binding: Pair your transmitter and receiver (e.g., FrSky, Radiomaster).
- Calibration: Use configuration software to calibrate gyroscope, accelerometer, and ESCs.
- FPV Setup (Optional): Mount the camera and VTX module, and test the video feed.
- Propeller Balancing: Install and align propellers for vibration-free flight.
- Test Flight: Start with hover tests indoors, then expand to outdoor GPS flight modes.
6. Integrating AI and Advanced Features
In 2025, many DIY drones include AI-assisted functions such as:
- Object tracking and avoidance (using AI chips like NVIDIA Jetson Nano).
- Autonomous route planning via onboard computer vision.
- Telemetry and mobile app integration for live monitoring.
- Smart battery management and real-time diagnostics.
These systems are often integrated through open frameworks such as ROS (Robot Operating System) or MAVLink.
7. Common Mistakes to Avoid
- Mixing ESC and motor ratings (always match current and KV).
- Ignoring PCB grounding and EMI shielding.
- Using cheap connectors that overheat.
- Skipping sensor calibration before first flight.
- Flying without propeller guards during testing.
Attention to detail at the circuit level determines whether your drone flies smoothly or crashes unexpectedly.
8. Final Thoughts
Building a DIY drone from individual components isn’t just about saving money - it’s about understanding every electrical signal, sensor reading, and control pulse that keeps your aircraft stable.
From sourcing your first kit online to designing a custom PCB and flashing open-source firmware, each step teaches you how drones truly work. Once you master it, upgrading to AI navigation, smart telemetry, or even swarm control becomes a natural next step.
So pick up your toolkit, open GitHub, and start building. The sky is yours to engineer.